မင်္ဂလာပါ။
ကျွန်တော်ကတော့ Spiceworks Myanmar တွင် အလုပ်လုပ်ကိုင်လျက်ရှိသော ဌေးမင်းခေါင် ဖြစ်ပါတယ်။ ယနေ့ ကျွန်တော်ကတေ့ JQuery Library ကို အသုံးပြုပြီး DOM များကို Styling လုပ်ခြင်း၊ Event များ ထည့်သွင်းခြင်း များနှင့် ပတ်သက်၍ ပြောပြချင်ပါတယ်။
အရင်ဦးဆုံး index.html ဖိုင်လေး အရင် တည်ဆောက်ပါမယ်။
ပြီးရင် html ကုဒ်များ ထည့်ပါမယ်။
JQuery ( Styling & Events )
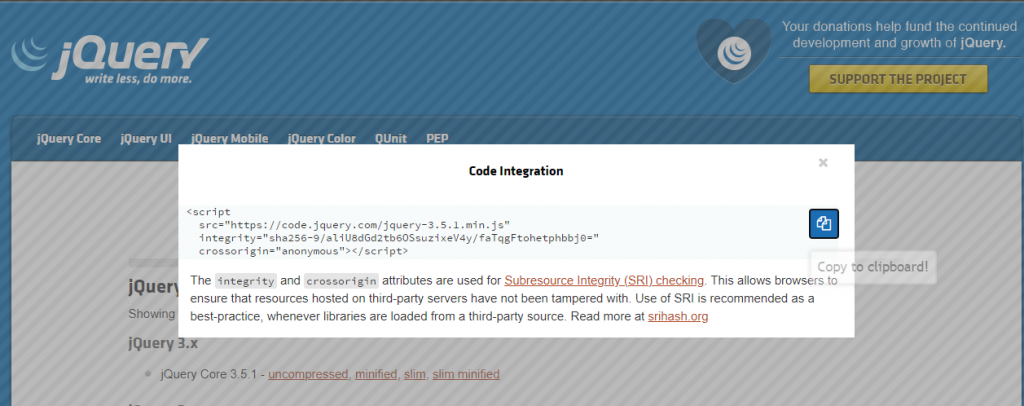
JQuery ကို အသုံးပြုဖို့အတွက် CDN ချိတ်ပါမယ်။
CDN ကို ချိတ်သုံးဖို့အတွက် ဒီ link ကို https://code.jquery.com/ ဝင်ပြီး minified ကို နှိပ်လိုက်ပါ။ Pop Up Box ပေါ်လာရင် Copy Icon ကို နှိပ်၍ Copy ကူးပါ။

ပြီးရင်
Tag အောက်တွင် Paste လုပ်ပေးပါ။အခုဆို JQuery ချိတ်လို့ ပြီးသွားပါပြီ။
div နှစ်ခုနဲ့ button သုံးခု ထည့်ပါမယ်။
CSS Style ထည့်ပါမယ်။ Style အဖွင့် အပိတ်ဖြင့် ရေးပြီး အောက်က ကုဒ်ကို ထည့်ပါမယ်။
	#css_styling{
		border: 1px solid black;
		width: 250px;
		height: 250px;
	}

	.actions{
		margin-top: 10px;
	}
အခုဆိုရင် div button များ နေရာချပြီးပါပြီ။ Button များအတွက် Click Event အရင် ထည့်ပါမယ်။
နံပါတ် ၁ ( Single Styling )
Styling တစ်ခုချင်းစီ ထည့်ပါမယ်။
$('.action.add').click(function(){

	// Apply CSS Styling with Single Styling
	$('#css_styling').css("borderColor", "red"); // Method 1
	$('#css_styling').css("border-color", "red"); // Method 2

});
CSS Styling ကို inline ပုံစံ JQuery ဖြင့် ထည့်ခြင်း ဖြစ်ပါတယ်။ Method 1 နဲ့ Method 2 မိမိကြိုက်တဲ့ ပုံစံဖြင့် ရေးလို့ ရပါတယ်။
အခုဆို Add ခလုတ်ကို နှိပ်မယ်ဆိုရင် div မှာ border အရောင် အနီဖြစ်သွားမှာ ဖြစ်ပါတယ်။
နံပါတ် ၂ ( Multiple Styling )
Styling ကို တစ်ခုထပ်မက ထည့်ချင်တယ်။ ကုဒ်ကိုလည်း တစ်လိုင်းတည်း ရေးချင်တယ်ဆိုရင် အောက်ပါ အတိုင်း ထည့်ပါမယ်။
	$('#css_styling').css({
		"border-color": "red",
		"background-color": "red"
	});
Styling ထည့်လို့ရသလို Animation နဲ့လည်း တွဲထည့်လို့ ရပါတယ်။
	$('#css_styling').animate({
		"width": "125px",
		"height": "125px",
	}, 500);
အခုဆိုရင် ကုဒ်က အောက်ပါအတိုင်း ထွက်လာပါမယ်။
$('.action.add').click(function(){

	$('#css_styling').css({
		"border-color": "red",
		"background-color": "red"
	});

	$('#css_styling').animate({
		"width": "125px",
		"height": "125px",
	}, 500);

});
အပေါ်ကုဒ်ကို Run မယ်ဆိုရင် border မှာ အနီရောင်ဖြစ်မှာ ဖြစ်ပြီး div size လည်း animation နှင့်အတူ ကြီးလာမှာ ဖြစ်ပါတယ်။
အခုတစ်ခါမှာတော့ remove button မှာ click event ကို ထည့်ပါမယ်။ Background Color အရောင်ကို ဖြုတ်ဖို့အတွက် blank ထားလိုက်ရင် ပျောက်သွားပါမယ်။
$('.action.remove').click(function(){
	$('#css_styling').css('background-color', '');
});
Remove All button အတွက်ကတော့ ခုနက ထည့်သမျှ ပြန်ဖြုတ်ချင်တဲ့အတွက် style တစ်ခုလုံးကို ဖြုတ်လိုက်ပါမယ်။
$('.action.remove_all').click(function(){
	$('#css_styling').removeAttr('style');
});
အခုလို ဖတ်ရှုပေးတဲ့ အတွက် ကျေးဇူးတင်ပါတယ်။ သာယာသော နေ့ရက်လေး ဖြစ်ပါစေ။


