မင်္ဂလာပါ။
ကျွန်တော်ကတော့ Spiceworks Myanmar မှာ Backend Developer အနေနဲ့ တာဝန်ယူလုပ်ကိုင်နေတဲ့ သုတယာမိုး ဖြစ်ပါတယ်။ ဒီတစ်ခေါက်မှာတော့ အသုံးများတဲ့ git commands အကြောင်းတွေကို ကျွန်တော်သိသလောက် ဝေမျှပေးချင်ပါတယ်။
Git ကတော့ team members, developers တွေ စုပေါင်းပြီး project တွေကို မြန်မြန်ဆန်ဆန်၊ ထိထိရောက်ရောက် လုပ်နိုင်စေတဲ့ verison control system (VCS) တစ်ခုဖြစ်ပါတယ်။ VCS ဖြစ်တဲ့အတွက် code တွေ ဘယ် file၊ ဘယ် folder တွေမှာ ပြောင်းလဲထားတယ်ဆိုတာကို မှတ်ထားပေးတယ်၊ အရင်ရေးပြီးသား version က ကုဒ်နဲ့ အခုရေးထားတဲ့ကုဒ်နဲ့ ကွာသွားတာတွေကို ပြသပေးတယ်၊ ကိုယ်လိုချင်တဲ့ version ကိုလည်း ပြန်ပြီး restore လုပ်နိုင်ပါတယ်။
Working, Staging & Repository Areas
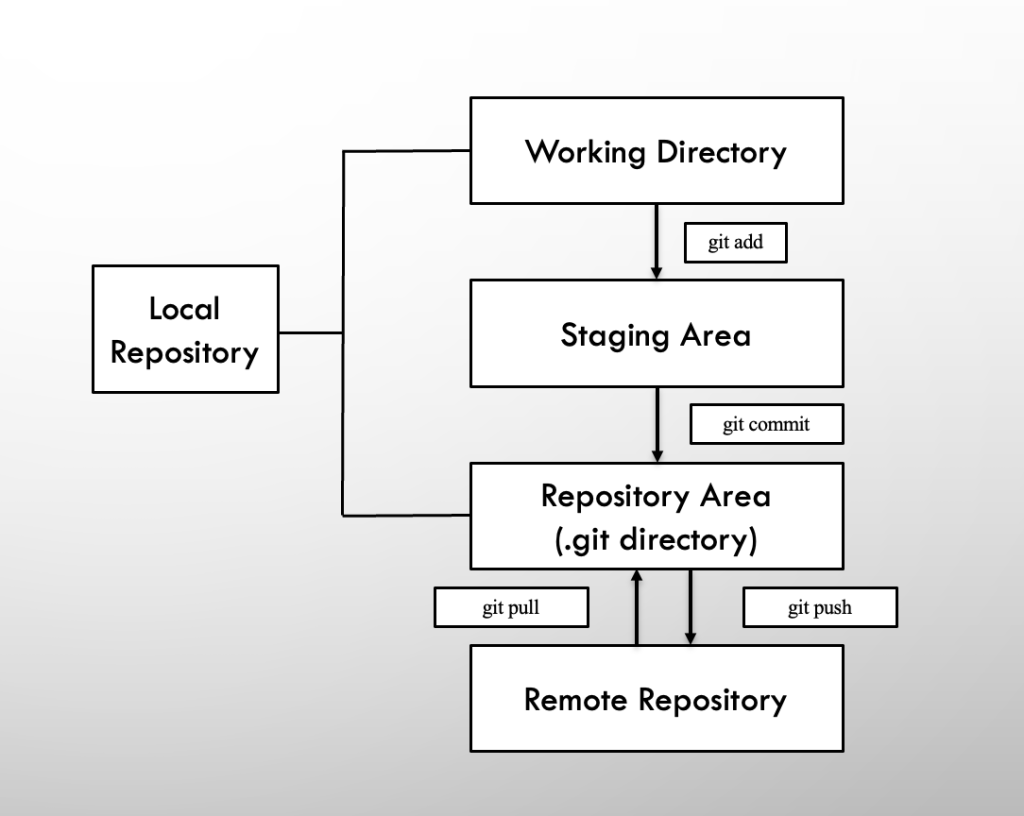
Git မှာ အဓိကျတဲ့ areas သုံးမျိုးရှိပါတယ်။
1. Working Directory
Woring Directory မှာတော့ ကျွန်တော်တို့ file နဲ့ folder အသစ်တွေထပ်တိုးမယ်၊ code တွေကို ပြောင်းလဲမှုတွေလုပ်တဲ့နေရာဖြစ်ပါတယ်။
2. Staging Area
Staging Area မှာတော့ local repository ထဲကို မသွားခင် နေရာဖြစ်ပါတယ်။ ဒီနေရာမှာ working directory ထဲကနေ နောက် commit မှာပါစေချင်တဲ့ ပြောင်းလဲမှုတွေကို သိမ်းထားပေးပါတယ်။ git add လုပ်ရင် ရောက်ရှိမယ့်နေရာလို့လည်း ပြောလို့ရပါတယ်။
3. Repository Area
Repository Area ကတော့ git add လုပ်ပြီးနောက် staging area အဖြစ်နဲ့ရှိနေတဲ့အရာအားလုံးကို git commit လုပ်တဲ့အချိန်မှာ local repository (.git/ folder) ထဲကိုပို့ပေးမှာဖြစ်ပါတယ်။
Git Init
Project တစ်ခုမှာ git သုံးမယ်ဆိုရင် git init (သို့) git clone နဲ့ အစပြုလို့ရပါတယ်။ git init ကို project က local machine ထဲမှာပဲ ရှိသေးတဲ့ အခြေအနေမျိုးမှာ အသုံးများပါတယ်။ git clone ကတော့ github, gitlab အစရှိတာတွေမှာ remote repository ရှိပြီးတဲ့ အခြေအနေမျိုးမှာ သုံးပါတယ်။ git init လုပ်ပြီးပြီဆိုရင်တော့ ကိုယ်ရဲ့ project directory အောက်မှာ .git/ folderကို ရရှိလာမှာဖြစ်ပါတယ်။
cd /project-folder
git init
Git Repository
Git respository ကတော့ ကိုယ်ရေးနေတဲ့ project ရဲ့ ပြောင်းလဲမှုအားလုံးကို သိမ်းထားပေးတဲ့နေရာဖြစ်တဲ့ .git/ folder ကိုပဲဆိုလိုတာဖြစ်ပါတယ်။ Local repository ကတော့ local machine ထဲက repository ကိုခေါ်တာဖြစ်ပြီး remote repository ကတော့ server တစ်ခုမှာ တင်ထားတဲ့ repository ကိုခေါ်တာဖြစ်ပါတယ်။
Git Clone
git clone ကိုတော့ github ပေါ်မှာရှိတဲ့ မိမိရဲ့ remote git repository (သို့) သူများရဲ့ repository ကို ကိုယ့်ရဲ့ local machine ထဲ copy ကူးလိုတဲ့အခါ၊ ကိုယ်ရဲ့ local repo ကိုပဲ နေရာပြောင်းချင်တဲ့အခါ အသုံးပြုပါတယ်။
git clone git@github.com:username/projectname.git
git clone git@github.com:username/projectname.git mygit
git clone git@github.com:username/projectname.git .
Line 1 command ကို သုံးမယ်ဆိုရင် /projectfolder/projectname ဆိုပြီး directory တစ်ခု ဆောက်ပေးမှာဖြစ်ပြီး သူ့ထဲကိုမှ remote repo က files များ ဝင်သွားမှာဖြစ်ပါတယ်။
Line 2 command ကို သုံးမယ်ဆိုရင် /projectfolder/mygit ဆိုပြီး directory တစ်ခု ဆောက်ပေးမှာဖြစ်ပြီး သူ့ထဲကိုမှ remote repo က files များ ဝင်သွားမှာဖြစ်ပါတယ်။
Line 3 command ကို သုံးမယ်ဆိုရင် /projectfolder/ folder ထဲကိုပဲ remote repo က files များ ဝင်သွားမှာဖြစ်ပါတယ်။
Git Add
git add ကတော့ working area ထဲကနေ staging area ကို ပို့ပေးတဲ့ command ဖြစ်ပါတယ်။
git add .
git add <filename>
git add . ဆိုရင်ပြောင်းလဲမှုရှိတဲ့ file မှန်သမျှကို staging area ကို ပို့ပေးမှာဖြစ်ပါတယ်။
ကိုယ်လိုချင်တဲ့ file ကိုပဲ staging area ထဲကို ပို့စေချင်တဲ့အခါ git add “filename” command သုံးရပါမယ်။
Git Commit
git commit ကတော့ staging area ကနေ repository area (.git/) ကို ပို့ပေးတာဖြစ်ပါတယ်။ git commit လုပ်တဲ့အခါ commit ရဲ့ message တွေထည့်ပေးရပါတယ်။ ထိုအခါမှသာ တခြားသူက ဒီ commit မှာ ဘာတွေပါဝင်လဲဆိုတာကို နားလည်လွယ်မှာ ဖြစ်ပါတယ်။
git commit -m "message"
git commit -m "message" -m "another message"
Git Reset
git reset ကတော့ git add နဲ့ ဆန့်ကျင်ဘက်ဖြစ်ပြီး staging area ကနေ working directory area ကို ပြန်ပို့ပေးပါတယ်။ git reset ကို commits တွေ ဖျက်လိုတဲ့အခါမှာလည်း အသုံးပြုပါတယ်။
git reset .
git reset <filename>
git reset --soft <commit_id>
git reset --hard <commit_id>
–soft ကတော့ အခု reset လုပ်မယ့် commit ကို repository area ထဲ မထည့်ခင်အချိန်က ကိုယ် changes လုပ်ထားတာတွေ ကျန်ရှိနေစေချင်တဲ့ အခါသုံးပါတယ်။
–hard ကတော့ changes တွေကိုပါ ဖျက်ပေးသွားစေချင်တဲ့အခါ သုံးပါတယ်။
Git Fetch
git fetch ကတော့ remote repository မှာ ဘာတွေပြောင်းလဲနေတယ်၊ commit ဘယ်နှစ်ခုက local repository ထက် ရှေ့ဘယ်နှစ်ခုလောက်ရောက်နေတယ် ဆိုတာတွေကို checking လုပ်တဲ့ command ဖြစ်ပါတယ်။
git fetch <remotename>
Git Pull
git pull ကတော့ local repository ကို remote repository အတိုင်း up to date ဖြစ်စေဖို့၊ အခြားကိုယ်နဲ့တူတူ တွဲလုပ်နေတဲ့သူတွေ တင်ထားတာတွေ ကိုယ့်ရဲ့ local repository ထဲ ရောက်လာစေဖို့ သုံးပါတယ်။
git pull <remotename> <branchname>
Git Push
git push ကတော့ ကိုယ့် local repository ထဲက ပြောင်းလဲမှုတွေကို တခြား ကိုယ်နဲ့အတူတူ တွဲလုပ်နေတဲ့သူတွေ သိစေဖို့ သုံးပါတယ်။
git push -u <remotename> <branchname>
Git Status
git status ကတော့ working directory နဲ့ staging area ထဲက ပြောင်းလဲမှုတွေကို ပြပေးပါတယ်။ ဘယ် branch မှာအခု ရောက်နေလဲ၊ ဘယ် file တွေက ပြောင်းလဲမှုတွေလုပ်ထားလဲ၊ ဘယ် file တွေက အသစ်ထည့်ထားလဲ အစရှိတာတွေကိုပြပေးတဲ့ command ဖြစ်ပါတယ်။
git status
Git Diff
git diff ကတော့ ကွာခြားမှုတွေကိုပြပေးတဲ့ command ဖြစ်ပါတယ်။
	git diff
	git diff index.html
	git diff --staged
	git diff --staged index.html
	git diff <commit>..<commit>
Line 1 command ကတော့ working directory နဲ့ last commit နှစ်ခုကြားက ကွာခြားမှုတွေကိုပြပေးမှာဖြစ်ပါတယ်။
Line 2 command ကတော့ working directory နဲ့ last commit နှစ်ခုကြားက ကိုယ်လိုချင်တဲ့ file ရဲ့ ကွာခြားမှုတွေကိုပြပေးမှာဖြစ်ပါတယ်။
Line 3 command ကတော့ git add လုပ်ပြီးသွားတဲ့ အခြေအနေမှာဖြစ်ပါတယ်။ သူကတော့ staging area နဲ့ last commit နှစ်ခုကြားက ကွာခြားမှုတွေကိုပြပေးမှာဖြစ်ပါတယ်။
Line 4 command ကတော့ staging area နဲ့ last commit နှစ်ခုကြားက ကိုယ်လိုချင်တဲ့ file ရဲ့ ကွာခြားမှုတွေကိုပြပေးမှာဖြစ်ပါတယ်။
Line 5 command ကတော့ commits နှစ်ခုကြားက ကွာခြားမှုတွေကိုပြပေးမှာဖြစ်ပါတယ်။
Git Branch
git branch ကတော့ git ကို စပြီး initialize လုပ်ကတည်းက master branch ကတော့ default ပါလာမှာဖြစ်ပါတယ်။ Master branch က production လုပ်မယ့် code တွေပဲ ထားနေကျနေရာဖြစ်တဲ့အတွက် အပြောင်းအလဲတွေလုပ်ဖို့ ကောင်းတဲ့ နေရာမဟုတ်ပါဘူး။ တစ်ယောက်တည်းဆိုရင် ပြဿနာမဟုတ်ပေမယ့် team နဲ့ ရေးတဲ့အခါမျိုးမှာ branch တစ်ခုပဲသုံးနေမယ်ဆိုရင် code conflicts တွေ ခဏခဏဖြစ်နေမှာဖြစ်ပါတယ်။ အဲ့ဒါကြောင့် သက်ဆိုင်ရာ branch တွေခွဲပြီး ရေးဖို့ အတွက် သုံးပါတယ်။
git branch -a
git branch <branchname>
git checkout -b <branchname>
git checkout <branchname>
git checkout -d <branchname>
Line 1 command ကတော့ repository ထဲက branch အားလုံးကို ဖော်ပြပေးမှာဖြစ်ပါတယ်။
Line 2 command နဲ့ Line 3 command ကတော့ အသစ် branch တစ်ခု ဆောက်ပေးမှာ ဖြစ်ပါတယ်။
Line 4 command ကတော့ အခု ရှိပြီးသား branch တစ်ခုဆီသို့ ပြောင်းပေးတဲ့ command ဖြစ်ပါတယ်။
Line 5 command ကတော့ branch ကို delete လုပ်မှာဖြစ်ပါတယ်။
Git Merge
git merge ကတော့ ကွဲနေတဲ့အရာနှစ်ခုကို တစ်ခုတည်းဖြစ်အောင် ပြန်ပေါင်းစေဖို့ သုံးပါတယ်။ Master branch က new_feature branch က ပြောင်းလဲမှုတွေကို လိုချင်တဲ့အခါ merge လုပ်ပေးခြင်းဖြင့် new_feature branch က changes အားလုံးက main branch ဆီမှာ ပေါင်းပေးသွားမှာ ဖြစ်ပါတယ်။
git merge new_feature
Git Stash
git stash ကတော့ feature-a branch မှာ ကိုယ်အသစ်ရေးထားတဲ့ code တွေကို repostitory area ထဲကို သိမ်းဖို့ အဆင်သင့် မဖြစ်သေးဘဲ feature-b branch ကို သွားလိုတဲ့အခါမျိုးမှာ code တွေကို မဆုံးရှုံးအောင် သုံးပါတယ်။ stash changes လုပ်ထားပြီးပြီဆိုပါက လိုတဲ့အချိန် ပြန်ခေါ်သုံးလို့ရမှာဖြစ်ပါတယ်။
git stash
git stash save "message"
git stash list
git stash apply stash@{n}
git stash drop stash@{n}
git stash clear
Line 1 command နဲ့ Line 2 command ကတော့ changes တွေကို stash လုပ်ပေးမှာဖြစ်ပါတယ်။ “message” ကတော့ stash က ဘာအတွက်လုပ်တာလဲဆိုတာကို သိလွယ်အောင် ထည့်ပေးနိုင်ပါတယ်။
Line 3 command ကတော့ repository ထဲက stash list အားလုံးကို ဖော်ပြပေးမှာ ဖြစ်ပါတယ်။
Line 4 command ကတော့ stash list ကနေ ကိုယ်လိုချင်တဲ့ stash number ကိုပဲ ပြန်ယူသုံးမှာဖြစ်ပါတယ်။
Line 5 command ကတော့ stash list ကနေ ကိုယ်ဖျက်ချင်တဲ့ stash number ကို ဖျက်ပေးမှာဖြစ်ပါတယ်။
Line 6 command ကတော့ repository ထဲက stash list အားလုံးကို ဖျက်ပေးမှာဖြစ်ပါတယ်။
Git Log
git log ကတော့ repository ရဲ့ ဖြစ်ခဲ့သမျှ မှတ်တမ်းတွေကို ပြန်ကြည့်ဖို့ သုံးပါတယ်။
git log
git log --oneline --decorate --graph
.gitignore
Git ကနေ track မလုပ်စေချင်တဲ့ file တွေ၊ folder တွေကို .gitignore file ထဲမှာ ရေးပေးရပါမယ်။
file.txt
folder/
*.dmg
*.apk
အချိန်ပေးပြီးဖတ်ပေးတဲ့အတွက် ကျေးဇူးတင်ပါတယ်ခင်ဗျ။