မင်္ဂလာပါရှင့်။
ညီမကတော့ Spiceworks Myanmar မှာ Backend developer အနေနဲ့ ဝင်ရောက်လုပ်ကိုင်နေတဲ့ မသဲစုလွင် ဖြစ်ပါတယ်။ ညီမ ဒီနေ့ပြောပြသွားမည့် အကြောင်းအရာကတော့ WordPress Custom Theme တစ်ခုဆောက်ဖို့အတွက်လိုအပ်သော အခြေခံလုပ်ဆောင်ချက်များကို ဝေမျှသွားမှာဖြစ်ပါတယ်ရှင့်။
ပထမဦးစွာ ညီမတို့ ထည့်သွင်းမည့် custom wordpress theme အတွက် folder တစ်ခုကို ဆောက်ပါမယ်။ ထို့အတွက် Figure (1) တွင် ပြထားသည့်အတိုင်း wp-content > themes > custom theme ဆိုပြီး folder တစ်ခုဆောက်လိုက်ပါတယ်။
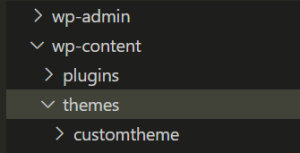
Figure (1) – Folder structure
ဆက်လက်ပြီး custom theme ထဲတွင် style.css, index.php နှင့် screenshot.png တို့ကို Figure (2) အတိုင်း ထည့်သွင်းပါမယ်။
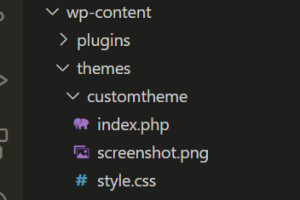
Figure (2) – Create style.css, index.php and screenshot.png
Style.css ဆိုတာကတော့ WordPress theme တစ်ခုမှာ မရှိမဖြစ်လိုအပ်သော css file ဖြစ်ပြီး Figure (3) တွင် ပြထားသည့်အတိုင်း theme name, author, author uri, version စသည့်အချက်များကို ထည့်သွင်းရေးထားနိုင်ပါသည်။
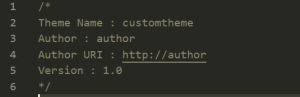
Figure (3) – Style.css
Screenshot.png သည် ညီမတို့ custom theme ၏ preview ကို screenshot ရိုက်ပြီး ထည့်သွင်းထားခြင်း ဖြစ်ပါသည်။
နောက်တဆင့်အနေနဲ့ ညီမတို့ custom theme ကို activate လုပ်ပါမယ်။ ထို့နောက် WordPress post များကို ထုတ်ဖို့အတွက် index.php တွင် Figure (4) အတိုင်း coding ရေးပါမယ်။
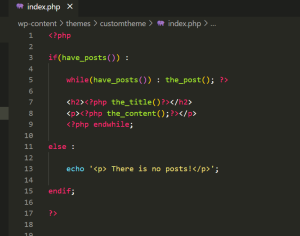
Figure (4) – index.php
ထို့နောက် header နှင့် footer ထည့်ရန်အတွက် header.php နှင့် footer.php file များကို ညီမတို့ custom theme folder ထဲတွင် ထပ်ထည့်ပါမယ်။
ညီမတို့ custom theme တွင် style များကိုထည့်သွင်းလိုပါက functions.php တွင် Figure (5) အတိုင်း ထည့်သွင်းနိုင်ပါသည်။
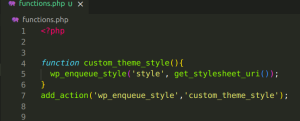
Figure (5) – Functions.php
အထက်ပါ အကြောင်းအရာများကတော့ wordpress theme တစ်ခုကို custom ရေးချင်တဲ့အခါမျိုးမှာ လိုအပ်သော အခြေခံအချက်အလက်အနည်းငယ်သာ ဖြစ်ပါတယ်။ အဆုံးထိ ဖတ်ရှုပေးခဲ့သော စာဖတ်သူများအားလုံးကိုကျေးဇူးတင်ပါတယ်ရှင့်။